
Instructions
Getting Started
- Create a slip knot, leaving a 2-3 inch tail of yarn.
- Chain 6, then join the chain into a ring with a Slip Stitch (SL).
Row 1 (Center Circle)
- Ch 3 (counts as the first DC).
- Work 19 DCs into the ring.
- SL into the top of the beginning Ch 3. (You should have a total of 20 stitches in this row.)
Row 2 (Doubling)
- Ch 3 (counts as the first DC).
- DC in the same stitch where you joined.
- Work 2 DCs in each stitch all the way around. You should now have 40 stitches.
- Join with a SL into the top of the first Ch 3.
Row 3 (Adding Chain Spaces)
- Ch 4 (counts as 1 DC and a Ch 1 space).
- DC into the next stitch.
- Ch 1, DC into the next stitch.
- Repeat from * to * around the row. You’ll have 40 DCs and 40 Ch-1 spaces.
- Join with a SL into the 3rd chain of your starting Ch 4.
Row 4 (Loops Begin)
This row sets the foundation for the iconic Virus Crochet wave pattern. Pay attention to the corners and spacing.
- Ch 5, SC into the second chain from the hook. (This creates the first big loop.)
- Ch 3, skip 1 chain, SC in the next stitch.
- Repeat this 2 more times to form a total of 3 small loops.
- Work a big loop by chaining 5, skipping one stitch, and SC in the next stitch. Then create 1 more big loop.
- Continue with 3 small loops, followed by 2 big loops. Repeat this pattern around until you have a large loop at each corner and smaller loops filling the spaces between.
- Finish the row by working a Ch 5, SC into the same space as the starting loop, then join with a SL.
Row 5 (Filling Loops)
- Ch 3, work 9 DCs into the first big loop.
- SC into the next small loop, then Ch 3. SC into the following small loop, Ch 3. SC into the last small loop, then work 10 DCs into the next big loop.
- Repeat from * to * until you’ve filled all big loops with 10 DCs each and worked SCs and chains into the small loops.
- At the corner big loops, work a total of 20 DCs – 10 in the first big loop and 10 in the next.
- Finish with 10 DCs into the last big loop and join with a SL.
Row 6 (Building Out the Edges)
- Ch 3, DC into the next 9 DCs (1 DC per stitch).
- SC into the chain space, Ch 3, then SC into the same chain space. (This creates a small loop on top of the small loops from Row 4.)
- DC into the next 20 stitches, SC into the next chain space, Ch 3, SC into the same chain space.
- Repeat all the way around. At the corners, continue to work the growing DC panels. End with a SL into the top of the starting Ch 3.
Row 7 (Adding Ch-1 Spaces)
- Ch 4 (counts as 1 DC and Ch 1).
- DC into the next stitch, then Ch 1. Repeat for all 10 stitches in the current panel (10 DCs, 9 Ch-1 spaces).
- At the corners, skip the Ch-3 space and work DC, Ch 1 into the next 20 stitches. Repeat this same sequence until you’ve completed all 4 edges.
- Finally, join with a SL at the top of the beginning Ch 4.
Row 8 (Repeat the Loops)
Using the same technique as Row 4, recreate the mix of small and big loops. Remember, each corner should always include 2 big loops connected by SCs, and the spaces between corners are filled with small loops.
- Start with a Ch 5 and SC to form the first big loop.
- Ch 3, skip 1 chain, SC in the next. Form 3 small loops, followed by 2 big loops.
- Repeat this all the way around.
Row 9 (Repeat Filling Loops)
Repeat the steps from Row 5, filling the big loops with sets of 10 DCs. Work SCs and chains into the small loops as before.
Row 10 (Repeat Building Edges)
Repeat the steps from Row 6, expanding the DC panels and Ch-3 loops.
Row 11 (Repeat Adding Ch-1 Spaces)
Follow the instructions from Row 7 to add more Ch-1 spaces.
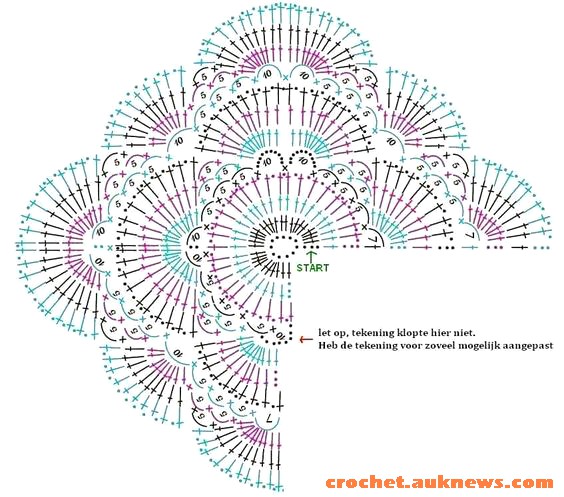
The Repeat Rule
From this point on, simply follow these repeating rows:
- Row 4 (Loops): Establish small and big loops.
- Row 5 (Filling Loops): Fill the big loops with DCs, SCs, and chains.
- Row 6 (Building Edges): Expand DC panels and add small loops at chain spaces.
- Row 7 (Ch-1 Spaces): Add DCs and Ch-1 spaces to keep the panels growing.
Continue repeating these rows to make the blanket as large as you like. The design is both intricate and rhythmic, giving it that mesmerizing “Virus Crochet” look.
Enjoy your crocheting, and don’t forget to play around with colors to make it truly your own! Happy stitching!
